To invite new users to sign up by sending out an invite direct from Life QI you need to have Administrator privileges.
To create an invite:
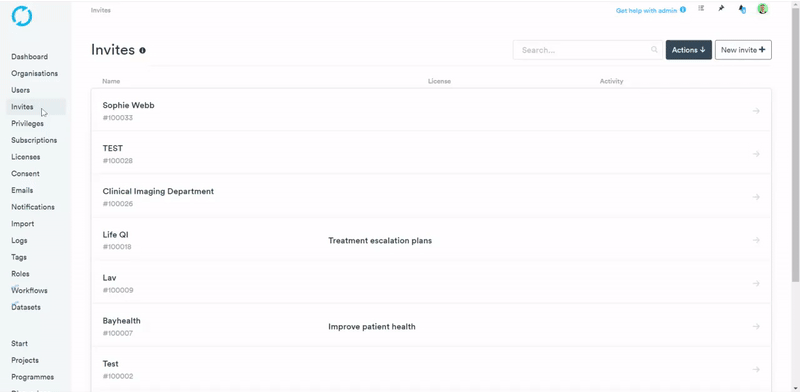
1. From the left-hand panel click Admin and then Invites.
2. Click the New invite + button.
3. Enter the email address of the person you are inviting then click the Add+ button
The email address will then display below the Add button. (Repeat step 3 until you have populated the full list of invites).
4. Click next – This will take you to the “Would you like to customise the invite message?” You can customise the message that is sent to your invitees by adding your own message in the 'Message' field. When you start to type you will see your message pre-populate in the preview field. Your message will be added to the standard text that is necessary in all invite emails.
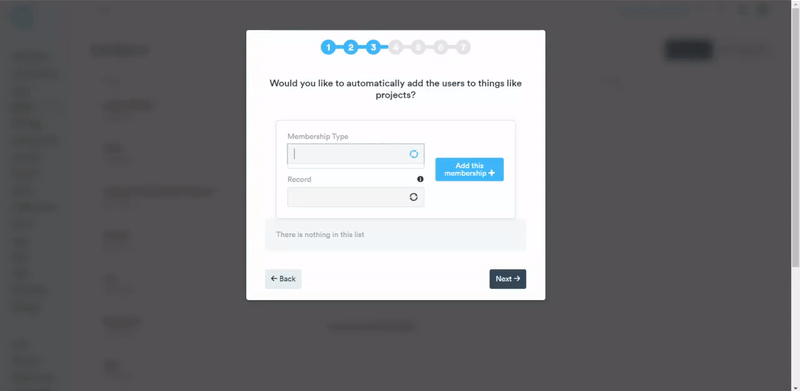
5. Click Next – You should now see "Would you like to automatically add the users to things like projects?"
5(A) Click the Membership Type drop down box and select either Project, Group or Discussion.
5(B) Click the record drop down box and select the record you would like to link the users too.
Repeat steps 5(A) to 5(B) if you would like to add multiple memberships.
6. Click Next and you will be taken to “Would you like to automatically pin records for the recipient?”
6 (A) Click the Pin Type drop down box and select either Project, Group or Discussion
6 (B) Click the record drop down and select the record you would like to pin to the invited user’s profiles page.
Click the Add this pin+ button.
Repeat steps 6(A) to 6(B) if you would like to add multiple pins.
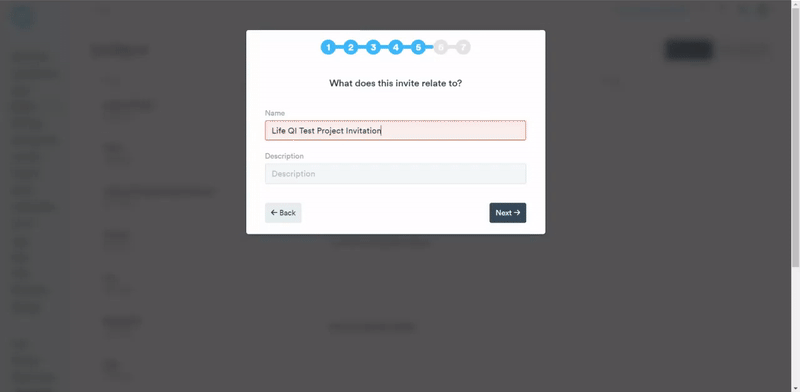
7. Click Next and you will be taken to “What does this invite relate to?”
Fill in the name and description.
8. Click Next and you will be taken to “Will anyone else help you manage this invite?”
If you don't want to add extra members to manage the invite, click Next.
If you would like to add members to help manage this invite, follow the steps 8(A) to 8(E):
8(A) Click the Invite new members+ button
8(B) Search for users and click their name.
8(C) Select their role from the drop-down menu
8(D) Choose users permissions
8(E) Click Add
Repeat the steps above until you have your full list of members and then click Next.
9. Click Next and you will be taken to “Which subscription should users be licensed from?”
To pick a subscription, click on the drop down menu and search for the one that relates to your organisation. The list of available subscriptions is filtered to those available to you. If there are none in the list, you will need to setup a subscription before you can complete the invite process.
Select the Fixed License period choose yes or no.
If selecting yes, click the drop-down menu and choose between Days, weeks, months or years and input the units.
Click Save and send invites.
Please note. The bulk invite has only been saved at this point.
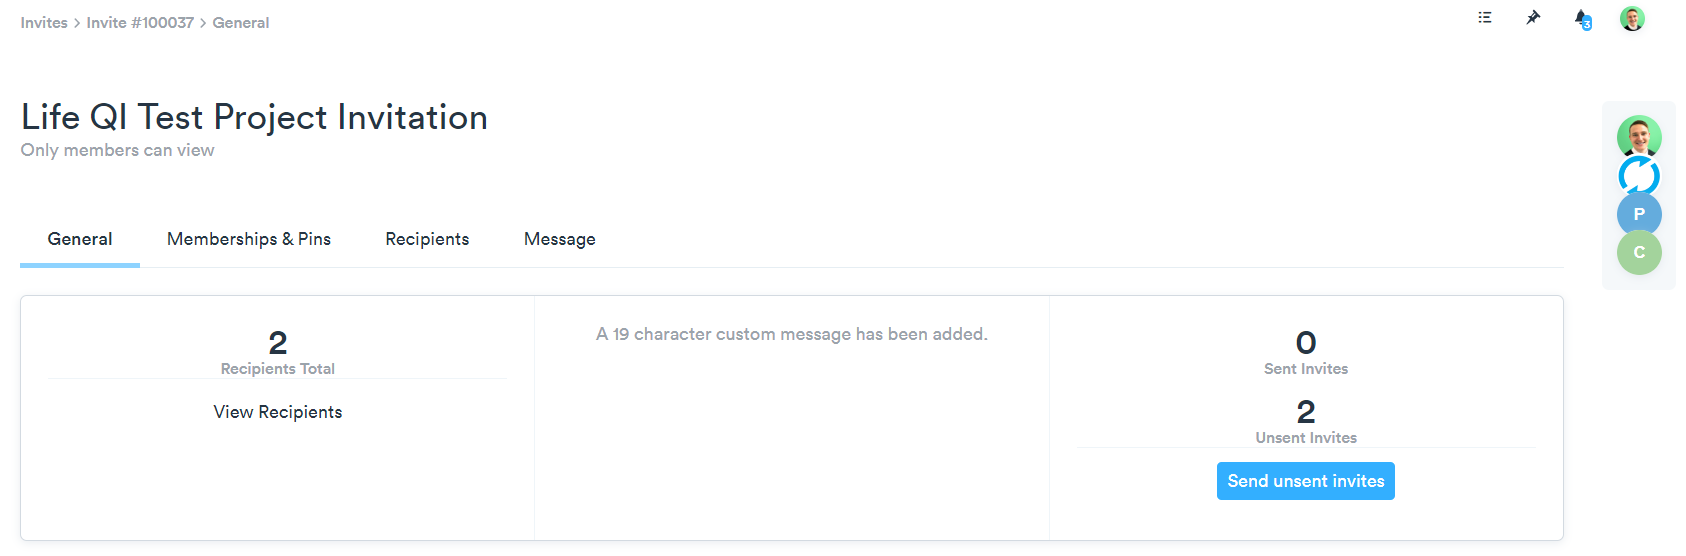
You will be redirected to the general page of the invite, here you can review your invite.
Click Send unsent invites.
Once recipients have accepted the invite you will be notified via email and in the notifications area.
Editing your invite
You can update any of the details of your invite after it has been sent out, or just add more people to the invite. Any changes made to the invite will only be applied to additional people added to the invite after the first circulation.
1. From the left-hand panel click Admin and then Invites.
2. Click your invite from the list
3. The General tab gives you an overview of your invite
4. Click Membership & Pins to view or edit. Follow the process in steps 5 & 6 for creating an invite and then click save.
5. Clicking Recipients you can view or Edit the Pending Users list
Click edit and you can add extra users to the list. Once happy with your list click Save.
6. Click Message then the Edit button. You can change the message field and the "Who should we say is doing the invite?" field only
Tracking your invite
You can track the progress of your invitees as they sign up from your Invite page. Once you have sent the invite the top of the invite page is split into General, Membership & Pins, Recipients & Message
1. From the left-hand panel click Admin and then Invites.
2. Click your invite from the list
- General - Gives you an overview of your invite. You can view sent and unsent invites.
If you have unsent invites and you click send, a preview window will generate.
Read through the preview and if you are happy click Confirm & Send unsent Invites otherwise click cancel - Membership & Pins - Displays the projects and pins that the users will automatically be added too. Click Edit if you would like to make changes. The changes will not affect people who have already been invited.
- Recipients - This list enables you to see which users are pending and which users are confirmed and verified. You can view how far along the invite process they are 'Invited' - Date & time of when the original invite went out.
If you would like to re-send the original email simply click the 'Re-send' button. Verified and Ready Users - You can view all of the 'Verified' users here - these are those that have completed the sign up process. The information listed will show when this person was invited, a date and time they confirmed the invite, date and time they were verified by the Administrator and finally a tick to indicate they have logged in.