
This article describes the steps you need to perform in both Life QI and Microsoft Entra ID to configure automatic user provisioning. When configured, Microsoft Entra ID automatically provisions and de-provisions users to Life QI using the Microsoft Entra provisioning service. For important details on what this service does, how it works, and frequently asked questions, see Automate user provisioning and deprovisioning to SaaS applications with Microsoft Entra ID.
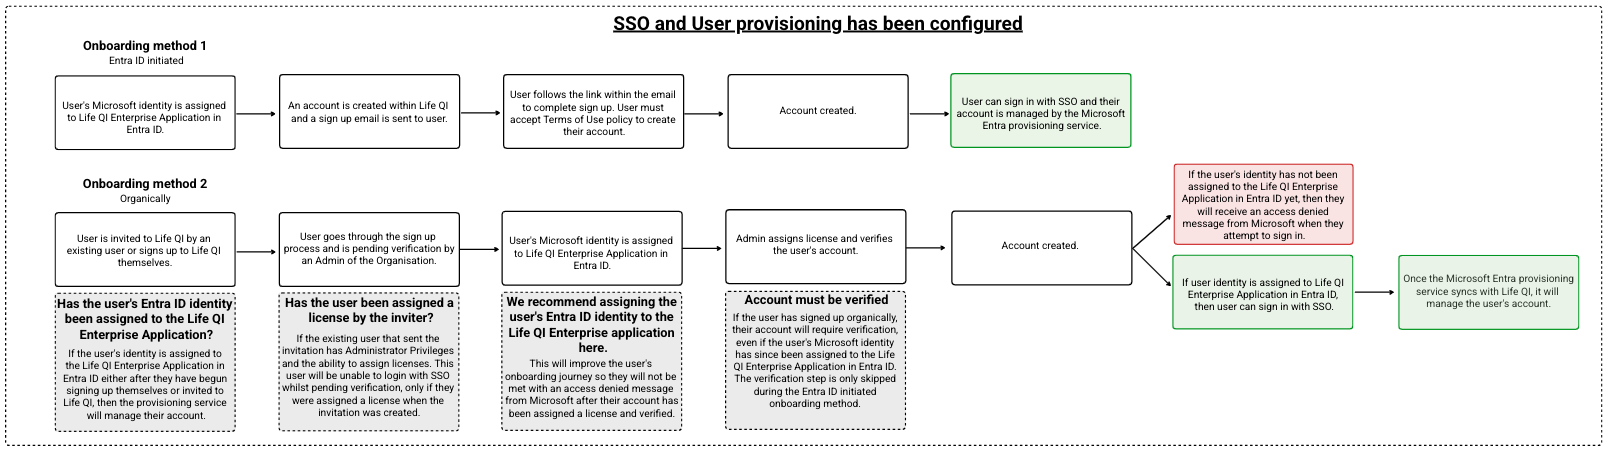
Once automatic user provisioning is setup, there will be two routes for user accounts to be created: automatically through user provisioning triggered from Microsoft Entra ID, or organically triggered by an invite from Life QI.
These routes are outlined in the flow diagram below:
Capabilities supported
✅ Create users in Life QI
✅ Keep user attributes synchronised between Microsoft Entra ID and Life QI
✅ Remove users in Life QI when they do not require access anymore
Prerequisites
The scenario outlined in this article assumes that you already have the following items:
- A Microsoft Entra tenant.
- One of the following Microsoft Entra ID roles: Application Administrator, Cloud Application Administrator, or Application Owner.
- A Life QI Professional or Enterprise subscription.
- A user account in Life QI with Administrator permissions.
- Completed the Single Sign On setup process for Life QI.
Article summary
Provisioning setup
- Step 1: Plan your provisioning deployment
- Step 2: Add Life QI to your Enterprise Applications in Entra ID
- Step 3: Define who will be in scope for provisioning
- Step 4: Configure automatic user provisioning to Life QI
- Step 5: Monitor your deployment
Step 1: Plan your provisioning deployment
- Learn about how the provisioning service works.
- Determine who will be in scope for provisioning.
Step 2: Add Life QI to your Enterprise Applications in Entra ID
Add Life QI to your Enterprise Applications in Entra ID to start managing provisioning. If you have previously setup Life QI for SSO (Prerequisite item), you can use the same application. See Set up single sign-on (SSO) for instructions on how to add Life QI to your Enterprise Applications and configure SSO in Entra ID.
Step 3: Define who will be in scope for provisioning
The Microsoft Entra provisioning service allows you to scope who will be provisioned based on assignment to the application and or based on attributes of the user. If you choose to scope who will be provisioned to your app based on assignment, you can use the following steps to assign users and groups to the application. If you choose to scope who will be provisioned based solely on attributes of the user or group, you can use a scoping filter as described here.
-
Start small. Test with a small set of users and groups before rolling out to everyone. When scope for provisioning is set to assigned users and groups, you can control this by assigning one or two users or groups to the app. When scope is set to all users and groups, you can specify an attribute based scoping filter.
This section guides you through connecting your Microsoft Entra ID to Life QI's user account provisioning API, and configuring the provisioning service to create, update, and delete assigned user accounts in Life QI based on user and group assignment in Microsoft Entra ID.
To configure automatic user provisioning to Life QI in Microsoft Entra ID:
-
Sign in to the Microsoft Entra admin center as at least a Cloud Application Administrator.
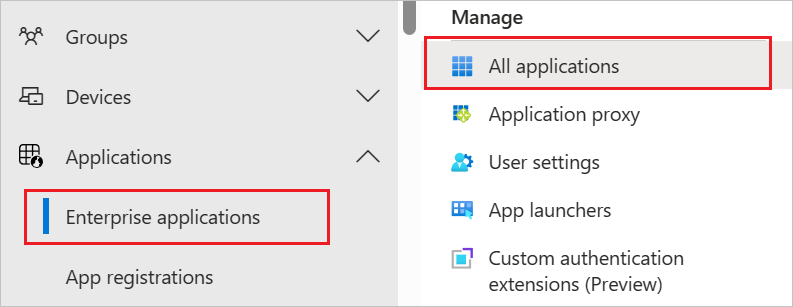
- Browse to Identity > Applications > Enterprise applications.
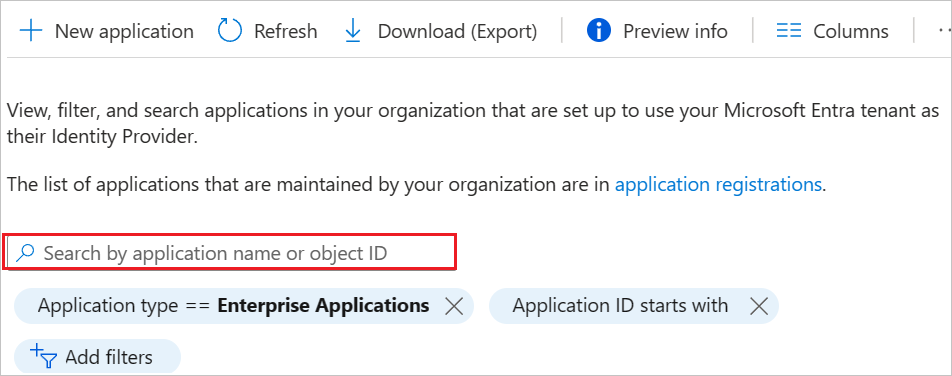
- In the applications list, select Life QI.
- Select the Provisioning tab.
- Set the Provisioning Mode to Automatic.

- Under the Admin Credentials section, you need to supply the Tenant URL and Secret Token required for Entra ID to connect to Life QI.
- Tenant URL - https://{Country Code}.lifeqisystem.com/scim/v2. The countryCode is the ISO 3166-1 alpha-2 code for your country (e.g. us, uk, nl, ca). The example below uses the UK countryCode.

- Secret Token - Login to Life QI with an Administrator account and navigate to /admin/subscriptions and select your organisation's subscription.
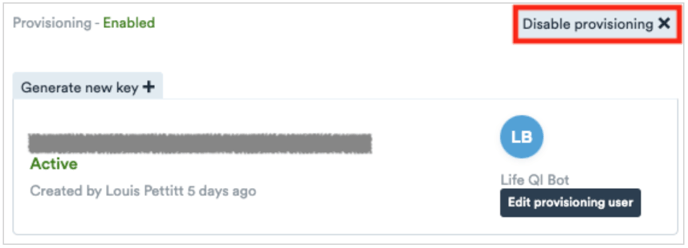
- Select Settings and scroll down until you see Enable Provisioning. Select this to generate a key.
- (A unique provisioning user will be created when enabling provisioning. This user can be ignored.)

- Copy the key from Life QI and paste it into the Secret Token field in Entra ID.

- Select Test Connection to confirm Entra ID is securely connected to Life QI.

- If connection fails at this point, please ensure the Tenant URL and Key matches before trying again.
- Under the Mappings section, you will define how data will flow between Microsoft Entra ID and Life QI.
- Microsoft Entra ID Group objects cannot be provisioned to Life QI. Select Provision Microsoft Entra ID Groups and disable Attribute Mapping. (User objects within Entra ID Groups can still be assigned and provisioned to the application)

- Select Provision Microsoft Entra ID Users and make sure it is Enabled.
- Source Object Scope - If you want to configure the Source Object Scope for users, you can do so here.
- Target Object Actions - Create, Update and Delete should be enabled by default.

- Attribute Mappings - Life QI only requires the Attribute Mappings as listed below. Remove all other default assigned mappings. The mail attribute should be assigned the Matching precedence of 1.
- If the UPN and Email address are the same in your tenant, the mail attribute within the User's contact information in Entra ID should be populated with the email address by default. If this is not the case and the mail attribute is empty see FAQs for more information.

- If the UPN and Email address are the same in your tenant, the mail attribute within the User's contact information in Entra ID should be populated with the email address by default. If this is not the case and the mail attribute is empty see FAQs for more information.
- Once the Attribute Mapping configuration has been completed, scroll up to the top of the page and select Save.
- Microsoft Entra ID Group objects cannot be provisioned to Life QI. Select Provision Microsoft Entra ID Groups and disable Attribute Mapping. (User objects within Entra ID Groups can still be assigned and provisioned to the application)
-
Under Settings, you can configure Notification Email to receive provisioning errors, Accidental deletion threshold to prevent unexpected user deletions and the provisioning Scope.
-
Configure these settings to your requirements.

-
-
Once the Settings have been configured, scroll up to the top of the page and select Save.

- Before setting the Provisioning Status to On within the Provisioning section, ensure you are happy with the user and group assignments or scope filter that has been applied.
- See Step 3: Define who will be in scope for provisioning to confirm the users in scope for provisioning to Life QI.
- Select the Provisioning tab and amend the Provisioning Status to On.
This operation starts the initial synchronisation cycle of all users and groups defined in Scope in the Settings section. The initial cycle occurs immediately, but can take longer to perform than subsequent cycles if provisioning a large amount of users. The incremental cycles after the initial cycle occur approximately every 40 minutes as long as the Microsoft Entra provisioning service is running.
Once you've configured provisioning, use the following resources to monitor your deployment:
- Use the provisioning logs to determine which users have been provisioned successfully or unsuccessfully
- Check the progress bar to see the status of the provisioning cycle and how close it is to completion
- If the provisioning configuration seems to be in an unhealthy state, the application will go into quarantine. Learn more about quarantine states here.
Life QI user provisioning life cycle
Once the Single Sign-On and Provisioning configurations have been applied to your Identity provider, the provisioned user will go through the following process.
Life cycle overview:
Account creation
Step 1: Account provisioned
A user account will be created within Life QI and a sign up email will be sent to the user. The email address this invitation is sent to is the email that appears in the mail attribute.
The user will not be able to login with SSO until they have completed the sign up process.
 The Pending status on a user account indicates the sign up process needs to be completed.
 This is what a user's account looks like before the sign up process has been completed.
Step 2: User sign up process
The email invitation the user will receive will include a confirmation code and a signup link. The user can disregard the confirmation code and follow the link to continue the sign up process.

Once the user has followed the sign up link within their invitation email, they will be greeted with Life QI's Terms of Use policy. Selecting Accept & login means the user agrees to this policy and completes the sign up process.

Step 3: User account information
The user account information has been provisioned as defined by the Attribute Mappings set in Entra ID. See the Entra ID Attribute* to Life QI Attribute mappings below:
- jobTitle* = Job Role
- givenName* = First Name
- surname* = Last Name
- mail* = Username

The user is also automatically made a member of the Organisation and assigned a license from the Organisation's subscription pool.
Account updates
Step 1: Attribute update
The following Attribute mappings will be synced from Entra ID to Life QI when updated.
- jobTitle* = Job Role
- givenName* = First Name
- surname* = Last Name
- mail* = Username

Attributes updated within Life QI will not update mapped attributes within Entra ID.
Step 2: Provisioning cycle takes place
Users in scope for provisioning to Life QI will be regularly synced by the Microsoft Entra provisioning service, which takes places approximately every 40 minutes. To provision immediately, you can Provision on Demand.
See how Entra ID provisioning cycles work here.
Step 3: Life QI attribute updated
Once the provisioning cycle has taken place, the mapped attribute within Life QI will be updated accordingly. 
If the mapped attribute does not update in Life QI, please see your provisioning logs for more information. 
De-provision accounts
The provisioning service supports both deleting and disabling (sometimes referred to as soft-deleting) users. Disable requests indicates that the user can't sign in. A Delete request indicates that the user has been removed completely from Life QI.
The scenarios that trigger a disable or a delete request:
- A user is soft-deleted in Microsoft Entra ID (sent to the recycle bin / AccountEnabled property set to false). Thirty days after a user is deleted in Microsoft Entra ID, they're permanently deleted from the tenant. At this point, the provisioning service sends a DELETE request to permanently delete the user in the application. At any time during the 30-day window, you can manually delete a user permanently, which sends a delete request to the application.
- A user is permanently deleted / removed from the recycle bin in Microsoft Entra ID.
- A user is unassigned from an app.
- A user goes from in scope to out of scope (doesn't pass a scoping filter anymore).
Removed from provisioning scope example
Step 1: Account removed from provisioning scope
Removing accounts from the provisioning scope in Entra ID will prevent the user from signing into Life QI.
- Scoping users or groups to be provisioned with scoping filters
- Manage users and groups assignment to an application
Step 2: Access denied
Access denied message received for an out of scope user trying to access Life QI.

FAQs
Can I automate secret key rotation?
- No. Key rotations must be manually initiated within Life QI. You can do this by selecting Generate new key + .
- Creating a new provisioning key will invalidate the current one. This will prevent any existing provisioning configuration from accessing Life QI until the secret token is updated with the new key.

What happens if I disable provisioning in Life QI?
- This will prevent any existing provisioning configuration from accessing Life QI.
- If you Enable provisioning again at a later date, you will need to update the secret token with the new key.
What if our user's UPN and Email address are the same in Entra ID?
- Life QI requires an email address to be used as the Username to be able to access the system, to receive support and notifications. If your UPN and Email address are the same in your tenant, the mail attribute within the User's contact information in Entra ID should be populated with the email address by default. No further action is required.
- If this is not the case and the mail attribute is empty, you can amend the provisioning mail attribute to userPrincipleName. Amending the provisioning mail attribute to userPrincipleName requires a similar update to your SSO Attributes and Claims configuration. Access issues can arise if these attributes differ.
Provisioning Attribute Mappings:userName = userPrincipalName
SSO Attributes & Claims:
emailaddress = user.userprincipalname

What happens if we exceed our total number of licenses available in Life QI?
- If you assign more than the purchased number of user licences allocated to your Organisation, your Account Exec' will be in touch to discuss either purchasing more licences, or reducing the number allocated to match or fall short of the purchased allocation.
- Users will be allocated an "Oversubscribed" license once your total number of available licenses has been exceeded. Access to Life QI will still be enabled for these accounts.
Can I define Life QI permissions with the Microsoft Entra provisioning service?
- No. Permissions are configured within Life QI. See Controlling permissions.
If a user who has been removed from scope is included back into scope at a later date, what will the outcome be to their account?
- If a user is unassigned from the Life QI application within Entra ID, then the user will be denied access when they next attempt to login. If their account is introduced back into scope, then they will be granted access again.
- If their Entra ID account is hard deleted, their Life QI account will be deleted and will therefore need to be re-created as per the account creation part of provisioning process. Membership to projects or groups linked to their original account will need to be provided again within Life QI by way of invitation or join request.
We have an on premises architecture, how do we connect to Microsoft Entra ID?
- You need to sync your local Active Directory to Entra ID.
- For an overview, please see Automatic user provisioning for hybrid enterprises.
- For setup examples, please see Steps to start integrating with Microsoft Entra ID.
Microsoft Entra ID provisioning articles:
- How Application Provisioning works in Microsoft Entra ID
- Scoping users or groups to be provisioned with scoping filters
- Manage users and groups assignment to an application
- Prevent accidental deletions
- What are the Microsoft Entra user provisioning logs?
- Entra ID Provisioning known issues